Here are some ways to use the function to deal with frequently occuring budget issues.
If your financial year ends in June, it’s budget time. Whether you use multiple files or multiple sheets to compile your budget, Power Query could be the solution to one of budgeting’s common problems. Power Query can compile a budget with minimum fuss. It can also automate the process, and in some cases provide an easy solution for versioning your budget. In many cases you will be able to retrofit Power Query into existing budget processes and automate manual processes.
Worked example
Let’s take a situation where we have four states. Each state has its own file to compile. Each file has five separate department input sheets, one for each department. We need to combine the four files and extract the five department sheets from each. Ideally, we want to create both a budget layout (months going across the page) and a data layout of the total budget.
This example will use a profit and loss budget.
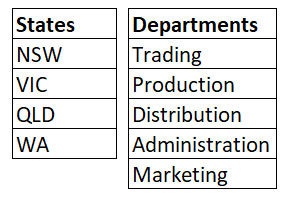
Figure 01 shows the lists of the four states and the five departments.

Figure 1.
The layout of each department sheet is shown in Figure 02. The middle month columns have been hidden.

Figure 2.
Column U ensures the total in column T is within tolerance of the total input in column D. Column V tests for any Excel errors. Each file has a separate sheet for each department, plus a Control sheet.
The process is to send the state file to each state manager who is responsible for completing the five department sheets, which make up the P&L. The updated files are returned, and each state file will be saved into the same folder. This allows us to have a separate folder for each version of the budget.
The companion materials for this article will include a zipped folder with the four budget files.
Just a reminder that Power Query is built into Excel 2016 and later versions. It is a free Microsoft add-in for Excel 2010 and 2013. This example will use Excel 2016 as the interface.
The screenshots and some of the options and button names may differ between versions. Power Query is being regularly upgraded. Screens and options may change over time. Power Query is also part of Power BI (Microsoft’s dashboard and reporting application). Any skills you learn in Power Query in Excel can be directly applied to Power BI.
Points to note
- When importing files all files must be closed.
- Power Query does not affect the source files in any way.
Steps
- In a blank file click the Data ribbon, and then the Get Data icon drop-down (far left). Choose From File, then choose From Folder.
- Click the Browse button. Navigate to the BUDGET folder, select it, and click Import.
- The files in the folder will be displayed. Click the Combine drop-down (bottom of dialog) and choose Combine & Transform Data.
- Click the Parameter option on the left side of the dialog and click OK.
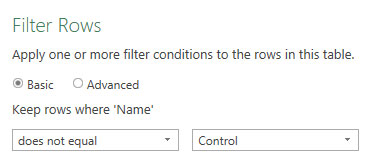
- The Power Query window will open and all the sheet names will be listed. We do not need the Control sheets to be imported. Click the filter drop-down in the Name column and use the Text Filter option to filter out (exclude) the Control sheet as per Figure 03. Click OK.
- Only the department sheets will now be listed. There is a special double arrow icon on the right of the Data column heading. Click this icon and then click OK.
- We do not need the first two columns or the last three columns. You can select and remove them using the Remove Columns icon on the Home ribbon, or right-click the column heading and choose Remove.
- The top three rows are not required. On the Home ribbon click the Remove Rows icon and choose Remove Top Rows and then type in 3 and click OK.
- The first row now contains the headers for the columns. Click the Use First Row As Headers icon on the Home ribbon.
- Remove the three columns Allocation, Months Between, and Number of Allocations. You can select the first column, hold the Ctrl key down and use the mouse to select the other columns ready to delete.
- To remove rows with no values, use the filter drop-down on the Account column, untick null and click OK. The null option is always shown at the top of the list. In Power Query, null means blank.
- To remove the remaining redundant rows, use the filter drop-down on the State column, untick null and State and click OK. This removes blank rows and the other heading rows.
- The data is ready to import. Click the Close and Load icon (top left of screen).
- The budget has been imported in a budget layout with months across the page.
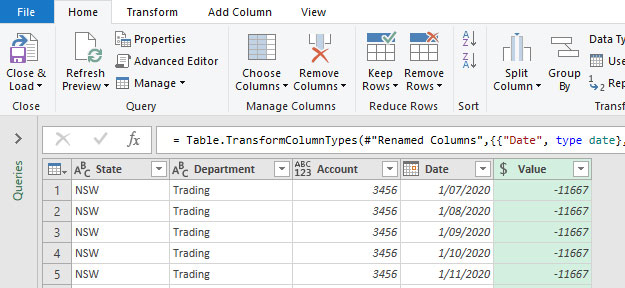
- We can also create a standard data listing of the budget. Figure 04 shows the final output structure. In the Queries Task Pane on the right of the screen, right-click the BUDGET query and choose Reference. This creates a new query that uses the output of the BUDGET query as its input (Source).

Figure 4.
- For this data listing we can remove the Total, Total _1, Validation and Error Validation columns. Note: the imported data had two Total columns. Power Query does not allow duplicated column headings, so it appends numbers to the duplicated column headings.
- Select the State column, then hold the Ctrl key down and select the Department and Accounts columns. Right-click the header of one of the three selected columns and choose Unpivot Other Columns. This will retain the columns selected and create two columns for the other entries as per Figure 04.
- Rename the Attribute column to Date. Right-click the header of the Date column and choose Change Type and Date. Change the type of the Value column to Currency.
- The budget has now been converted into a standard data layout – see Figure 04.
- Click Close & Load to finish.
We now have two separate listings of the same budget. We have a compiled budget file. To update the budget, you need to right-click the output table and choose Refresh.
To handle a new version of the budget, we could create a new folder, BUDGET_2, and save the revised files to that folder. The only change we need to make is in the initial BUDGET query.
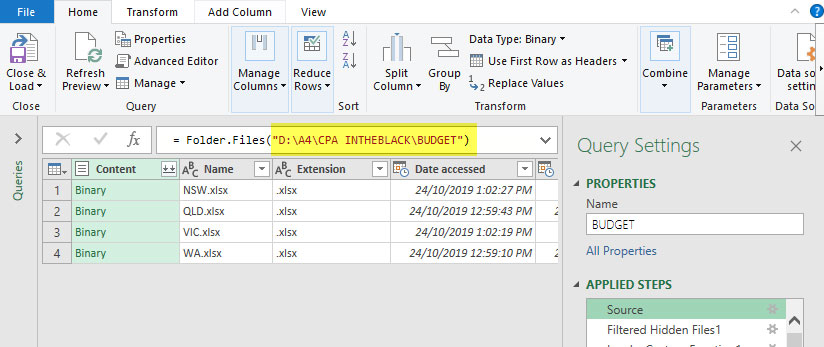
Edit the BUDGET query. Select the Source step on the right of the screen. The Formula Bar will display the path of the folder as per Figure 05. If the Formula Bar isn’t visible, click the View ribbon tab and tick the option.

Figure 5.
Simply change folder path in the Formula Bar and press Enter. Click Close & Load to create a whole new budget version. If you make an error, you can close the query (click the x on the top right), choose Discard and start again.
Things to note
- If you want to update a single state file, overwrite the existing file, refresh the first query and then the second query.
- If you had a new state, for example, TAS, simply save the TAS file to the folder and refresh the queries in sequence.
- These instructions assume that there are no other files are in the BUDGET folder. If there could be extra files, you’ll need to use an extra filter in step five to exclude those other files.
- This assumes only a Control sheet plus the Department sheets are in each file. If there were other sheets, they too would need to be excluded in step five.
The companion video and Excel files (blank & complete) will go into more detail to demonstrate these techniques.
Ref: Power Query


0 comments:
Post a Comment